7.9.3.15.3.  Attributes -> Dimensioning mode

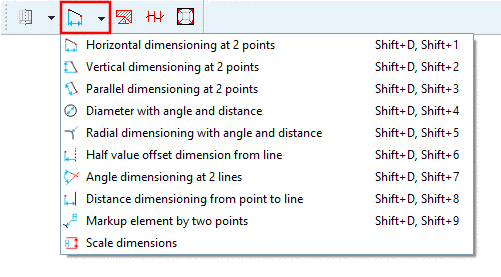
"Dimensioning [Dimensioning] " toolbar

"Dimensioning [Dimensioning] " toolbar

[Note]Note

The individual parameters of dimensions are displayed in the Edit element docking window.

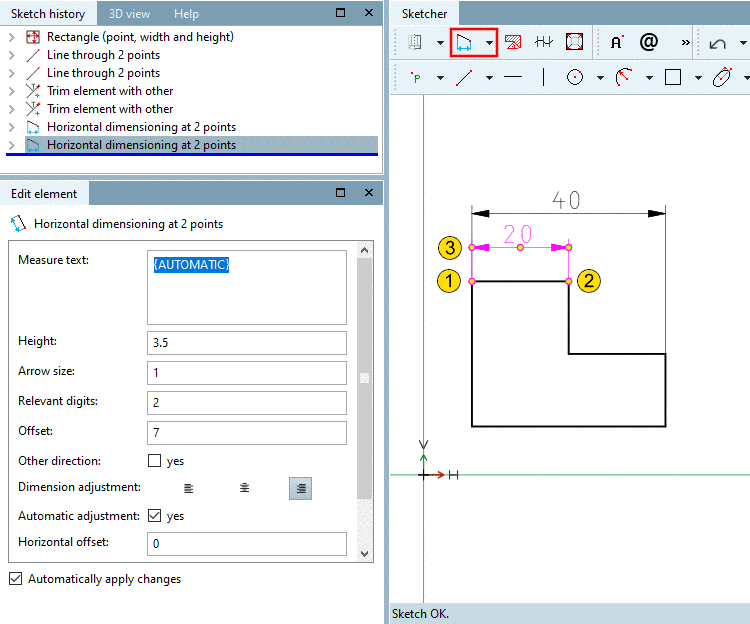
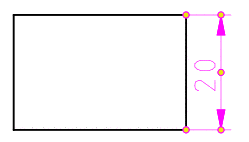
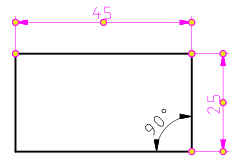
Example for horizontal dimension

Example for horizontal dimension

Details on the single tools and their parameters can be found in the following.

The dimensioning mode can be accessed in various ways:

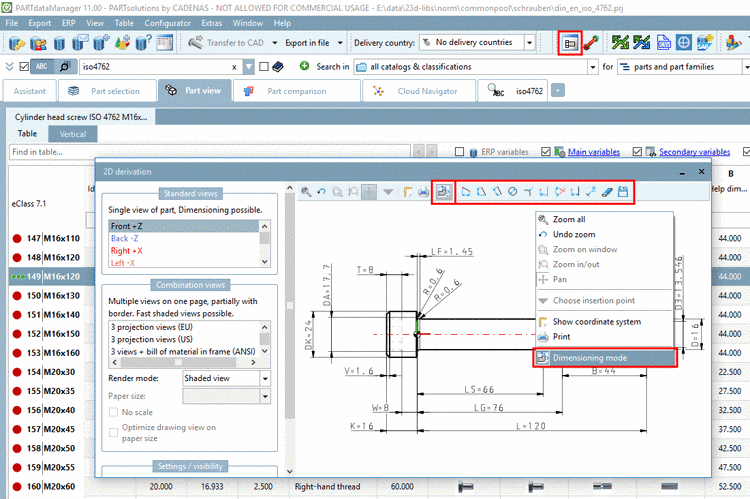
  • Via PARTdataManager -> 2D derivation button -> 2D derivation docking window -> Dimensioning mode context menu command or alternatively via Dimensioning mode icon.

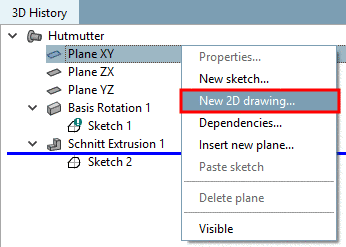
  • Via PARTdesigner -> Docking window 3D History -> Context menu Plane -> New 2D drawing [New 2D drawing...]..

    Call New 2D drawing. [New 2D drawing...].

    Call New 2D drawing. [New 2D drawing...].

    -> A view with Sketch History [Sketch history] and Sketcher opens.

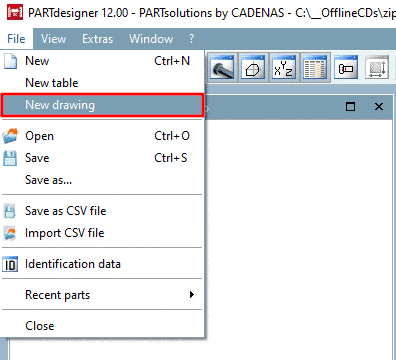
  • Via PARTdesigner -> File menu [File] -> New drawing

The individual tools/functions in dimensioning mode [Dimensioning mode] are explained below:

  • Horizontal dimensioning at 2 points

    1. Select first reference point...

    2. Select second reference point...

      Now the dimensioning line is attached to the cursor.

    3. Select dimension position or base dimension [Select dimension position or base dimension...]...: Drag the dimension line to the desired position.

      If it is about multiple dimensionings which shall connected with always the same offset, then first click on a base dimension and then on the desired position. In this case the offset refers to the base dimension and not on the line to be dimensioned itself. When a base dimension changes, all dimensioning based on it are also automatically changed.

      -> The Edit element docking window opens.

      Horizontal dimensioning at 2 points

      Horizontal dimensioning at 2 points

    4. If necessary, adjust the values of the individual parameters in the Edit element docking window:

      • Dimension text:

        By default, "{AUTOMATIC}" is displayed in curly braces.

        "AUTOMATIC" takes the current value from the geometry.

        Form the dimension text [Dimension text] statically or dynamically or mixed static-dynamic.

        Dimension text: static

        Enter any static text.

        Hello

        Dimension text: static-dynamic

        Combine both options.

        K={K}

        Dimension text: dynamic

        Enter only the desired variable. The respective value is generated dynamically.

        {L}

        Dimension text - 3 possibilities

        Dimension text - 3 possibilities

      • Height: Type size

      • Arrow size:

      • Relevant digits: Here you can define the decimal places [Decimal digits] of dimension text [Dimension text].

      • Offset: Distance of the measurement from the reference line

      • Other direction: The dimension line is positioned on the other side of the object.

      • Dimensional alignment [Dimension adjustment]:

        Dimension orientation [Dimension adjustment]: left

        Dimension orientation [Dimension adjustment]: left

        Dimension alignment [Dimension adjustment]: centered

        Dimension alignment [Dimension adjustment]: centered

        Dimension orientation [Dimension adjustment]: right

        Dimension orientation [Dimension adjustment]: right

      • Automatic alignment [Automatic adjustment]:

        • Checkbox deactivated: The specification under Dimension alignment [Dimension adjustment] is always taken into account.

        • Checkbox activated:: The specification under Dimension alignment [Dimension adjustment] is only taken into account if the dimension does not fit between the arrows.

      • Horizontal offset: Determines the horizontal offset of the dimension text from the center point.

  • Vertical dimensioning at 2 points

    See horizontal dimension at 2 points [Horizontal dimensioning at 2 points]

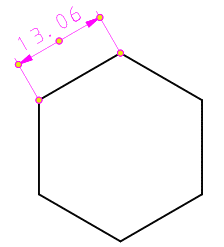
  • Parallel dimensioning at 2 points

    See horizontal dimension at 2 points [Horizontal dimensioning at 2 points]

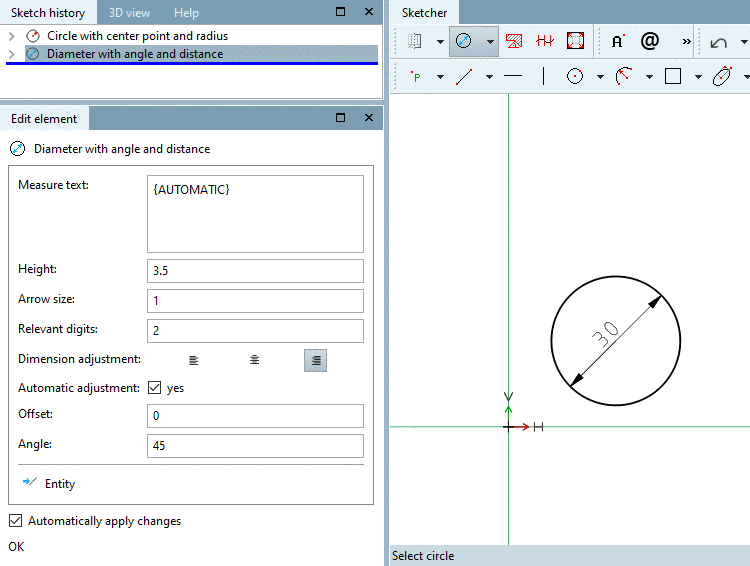
  • Diameter with angle and distance

    1. Select circle: Click on the circle to be dimensioned. --> The dimension line appears.

    2. Select dimension position: Position the dimension (inside or outside the circle).

      Option 1: Fix the angle [Angle] of the line with a single mouse click. Then drag the entire dimensioning to the desired position [Position] and fix it with a mouse click.

      Option 2: Fix the angle and position of the dimensioning in one step by double-clicking with the mouse.

    3. If necessary, adjust the dimensioning in the Edit element docking window using the input fields.

      Offset "0" results in the diagonal as a dimension line.

      Angle refers to the X-axis.

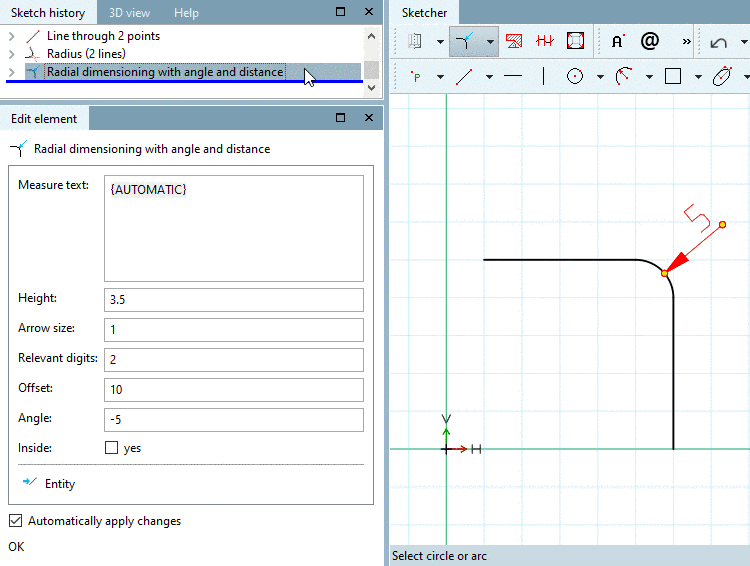
  • Radial dimensioning with angle and distance

    Create radius of a circle or arc

    1. Select circle or arc

      -> The dimensioning line is attached to the cursor.

    2. Select dimension position: Position the dimensioning and fix it with a mouse click.

    3. If necessary, adjust the individual parameters of the dimensioning in the Edit element docking window using the input fields.

      For example, you can adjust the angle. 0° lays on the bisecting line of the segment of the circle.

    Radial dimensioning with angle and distance

    Radial dimensioning with angle and distance

  • Half value offset dimension from line

    1. Select reference line [Select reference line...]...: Click on the reference line (rotation axis).

    2. Select dimension point [Select dimension point...]...: Click on the point whose distance to the reference line is to be dimensioned.

    3. Select dimension position or base dimension [Select dimension position or base dimension...]...: Click on a point in free space that approximately reflects the desired offset to the point.

      If it is about multiple dimensionings with always the same offset, first click on a base dimension and only then on a point in the free space. In this case, the offset refers to the base dimension and not to the point.

      -> The Edit element docking window opens.

    The drawing illustrates the dimension between rotational axis and line to be dimensioned (on the right [standard vertical dimensioning]) and half dimensioning (on the left [duplicate value]).

    The drawing illustrates the dimension between rotational axis and line to be dimensioned (on the right [standard vertical dimensioning]) and half dimensioning (on the left [duplicate value]).

    [Note]Note

    Rotationally symmetrical points are dimensioned from point to line [Half value offset dimension from line] using the half dimension [Half value offset dimension from line] function. The dimension line shown only describes half the dimension distance (hence "half dimension"), but the dimension value describes the entire dimension distance!

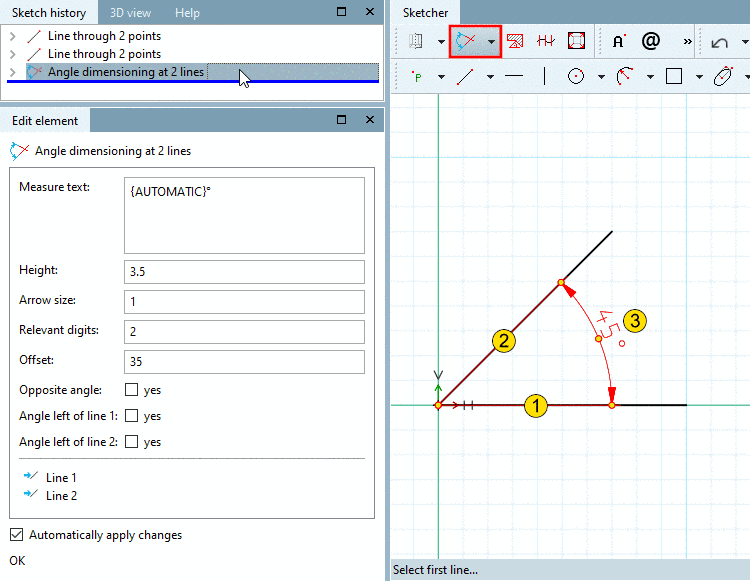
  • Angle dimensioning at 2 lines

    1. Select first line...

    2. Select second line... [Choose second line...] (counterclockwise)

    3. Select the distance and position of the dimension [Select distance and orientation of dimension...]...: The angle will be spanned depending on the selected quadrant.

    4. If necessary, adjust the parameters in the Edit element docking window.

    Angle dimensioning at 2 lines

    Angle dimensioning at 2 lines

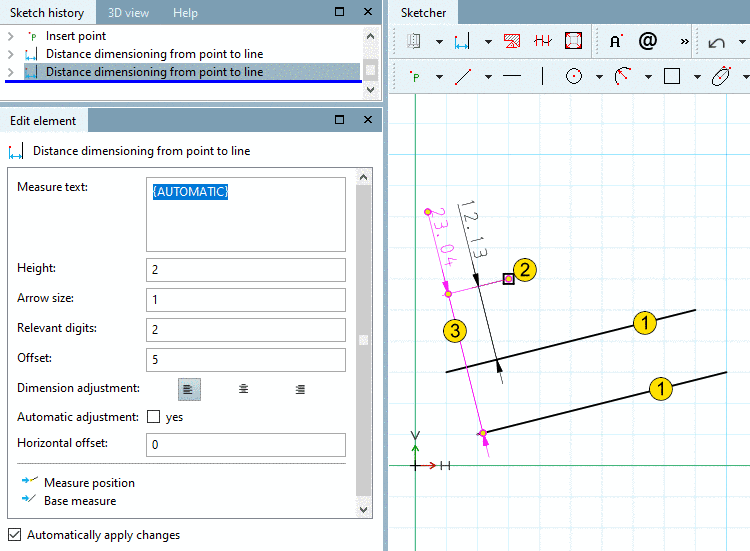
  • Distance dimensioning from point to line

    1. Select reference line [Select reference line...]...: Click on the reference line.

    2. Select dimension point [Select dimension point...]...: Click on the point whose distance to the reference line is to be dimensioned.

    3. Select dimension position or base dimension [Select dimension position or base dimension...]...: Click on a point in free space that approximately reflects the desired offset to the point.

      If it is about multiple dimensionings with always the same offset, first click on a base dimension and only then on a point in the free space. In this case, the offset refers to the base dimension and not to the point.

      -> The Edit element docking window opens.

    4. If necessary, adjust the dimensions using the input fields.

    Distance dimensioning from point to line

    Distance dimensioning from point to line

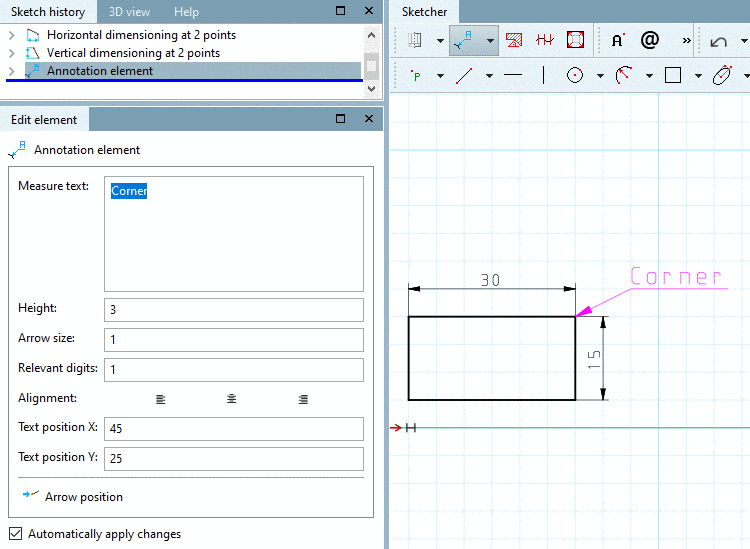
  • Markup element by two points

    These markup elements are partial notations and can be used in a variety of ways.

    Example

    Example

    Follow the instructions of the status line:

    1. Select arrow end point:

    2. Define text position:

    3. If necessary, adjust the parameters in the Edit element docking window.

      Text position refers to the bottom left-hand corner of the text.

    Markup element by two points

    Markup element by two points

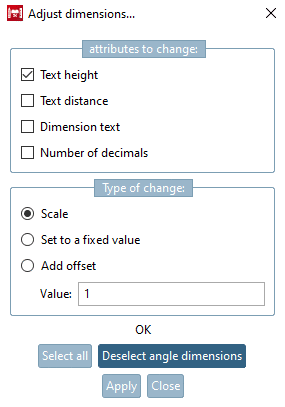
  • Scale dimensions

    When the dialog is opened, all dimensions are highlighted in color. Click on Deselect angular dimensions [Deselect angle dimensions] to exclude them from the change. Click on Select all [choose all] to include the angular dimensions again.

    Attributes to be changed:

    • Text height

    • Text spacing [Text distance] (offset)

    • Dimension text

    • Number of decimals

    Set a checkmark at the desired attribute.

    Determine the type of change [Type of change]:

    • Scale

    • Set to a fixed value

    • Add offset: Enter the desired value [Value] in the input field.

    Start the change with Apply.

    Adjust dimensions...

    Adjust dimensions...

In the PARTdataManager the following two tools are available in the dimensioning toolbar, in the PARTdesigner in the standard toolbar.

  • Delete dimensioning

    Click on the tool and then on the desired dimensioning.

  • Save drawing as 2db...

    A dimensioning can be saved as a 2D sketch (file template *.2db).

When moving the cursor over a dimensioning it will show up in red.

Context menu: Clicking with the secondary mouse button displays the context menu.

In the PARTdataManager you can make the following changes:
  • Change parameters [Change parameters...]...: The Change [Change parameter] parameters dialog box is called up.

  • Delete [Delete step] step: The selected dimensioning is deleted.

  • Delete step including dependent [Delete step include dependent elements]: The selected dimensioning is deleted including dependent.

In the PARTdesigner the following is also displayed:

  • Mark dependent elements: The structurally related dependent elements appear in pink.

  • Attributes -> Rotation axis