
The expiration date (end of life) or the expiration date for different phases of the product life cycle of projects can be set according to the specifications of the catalog manufacturer.
The expiration date can be set uniformly for entire projects, but also differently for individual rows. Information on setting the information for entire projects can be found under Section 5.9.2.12, “Menu item: Expiry date (End of Life) ”.
This section contains information on setting an expiration date manually line by line. Information on setting an expiry date automatically line by line (EndOfLife ) can be found at Section 5.8.2.1.20.19, “ Set EndOfLife line by line (via batch run) ”.
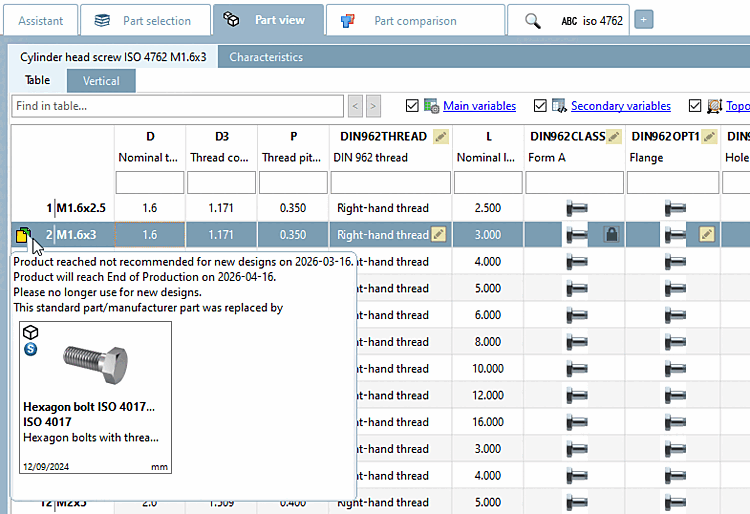
The expiration date is then displayed in 3Dfindit/PARTdataManager in the parts view [Part view]. A corresponding icon is displayed at the beginning of the line. On mouseover, a tooltip appears with the required information. If required, a replacement project can also be displayed.
In the following, procedure and setting options are described:
Select the desired tab/tac file under Project selection and click on the context menu command Mark rows as discontinued/edit.... [Mark/edit lines as expired...] at the beginning of the row on the far left of the table.
![PARTproject - Mark rows as expired/edit [Mark/edit lines as expired...]. .. [Mark/edit lines as expired...]](https://webapi.partcommunity.com/service/help/latest/pages/jp/partsolutions_user/doc/resources/img/img_16ca65212e0f4f01bb94554bab17b7d1.png)
PARTproject - Mark rows as expired/edit [Mark/edit lines as expired...]. .. [Mark/edit lines as expired...]
-> The Mark rows as discontinued [Mark lines as expired] dialog box opens.
![Mark lines as discontinued [Mark lines as expired] " dialog box](https://webapi.partcommunity.com/service/help/latest/pages/jp/partsolutions_user/doc/resources/img/img_116b7b581bb44cccbdf66054ca3da1db.png)