| ||||
Select a face whose adjoining edges shall be filleted.
Call up the context menu command Create new bevel/rounding [New Chamfer/Fillet...]... command.
-> The chamfer/rounding [Chamfer/Fillet] docking window opens.
Select the Rounding [Fillet] option and enter the desired radius [Radius] in the input field.
![[Note]](https://webapi.partcommunity.com/service/help/latest/pages/jp/installation_ecatalogsolutions/doc/images/note.png)
Note Whether a preview is displayed or only edge visualization [Edge visualization] depends on the settings made under Tools [Extras] menu -> Settings [Settings...]
The default setting is Deactivated, i.e. only edge visualization [Edge visualization]. Please note that considerable computing power is required for the preview. If the waiting times are too long, go back to the default setting.
For changes to take effect, please close the chamfer/rounding [Chamfer/Fillet] dialog and open it again using the Edit context menu command.
Details on the setting options can be found under Section 7.6.2.12.5.4, “ Preview display and edge visualization for chamfer/rounding ”.
In this example, the Chamfer surface [Chamfer] option was selected under Preview display [Preview presentation], i.e. the preview immediately shows the expected change.
Bevel/Rounding [Chamfer/Fillet] dialog box: Here as an example with option "Rounding [Fillet] " and radius [Radius] = 2
Example in 2D: Chamfer with setting "Distance 1 [Distance 1] " = 3 and "Distance 2 [Distance 2] " = 1 with a total edge length of the cube of 10
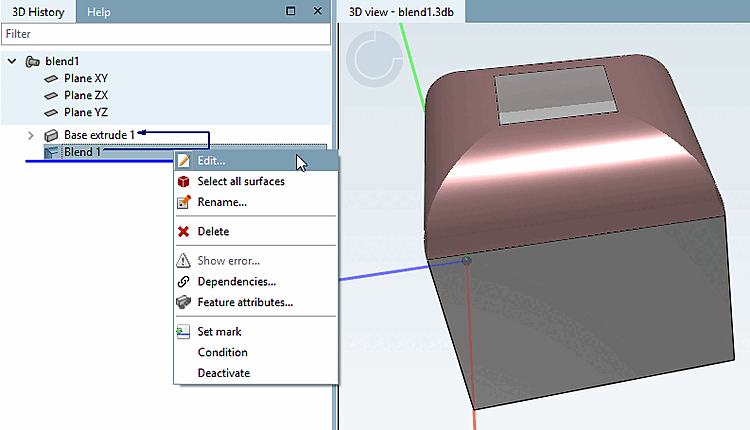
In the 3D history [3D History], you can use the context menu command above the blend feature via Edit. [Edit...].. to call up the dialog again at any time.
You can make any changes subsequently, which are immediately shown in the preview.
![Create new chamfer/rounding... [New Chamfer/Fillet...]](https://webapi.partcommunity.com/service/help/latest/pages/jp/installation_ecatalogsolutions/doc/resources/img/img_6a650a29048644b99e7d82a728dbfb6e.png)
![Bevel/Rounding [Chamfer/Fillet] dialog box: Here as an example with option "Rounding [Fillet] " and radius [Radius] = 2](https://webapi.partcommunity.com/service/help/latest/pages/jp/installation_ecatalogsolutions/doc/resources/img/img_40cdee0cc34f41d9bce7f81a3d562058.png)

![Example in 2D: Chamfer with setting "Distance 1 [Distance 1] " = 3 and "Distance 2 [Distance 2] " = 1 with a total edge length of the cube of 10](https://webapi.partcommunity.com/service/help/latest/pages/jp/installation_ecatalogsolutions/doc/resources/img/img_867c5c413e0e406c94a6c9425e47f052.png)