
In the Variable Management [Variable Management] dialog box, you can manage variables across the entire catalog—for example, to standardize naming conventions, set visibility, and much more. Click on a catalog, one or more projects, or any folder, then right-click > Automation [Automation] > Manage Variables [Manage variables] to open the Variable Management dialog box.
You receive a list of all variables from the underlying projects in table form with the corresponding columns Name, Description, Storage location [Save location], Unit, Group, Type, Data type, Decimal places, Status, Hidden, Translatable and Without list selection in a vertical table [Without list selection in vertical table].
![Variables management [Variable Management]" window](https://webapi.partcommunity.com/service/help/latest/pages/jp/installation/doc/resources/img/img_c94a880575f244e293331db4c9ee5a9b.png)
Click on a line to display the file path in the right-hand display window. Via the button button to open the project in PARTdesigner.
![[Note]](https://webapi.partcommunity.com/service/help/latest/pages/jp/installation/doc/images/note.png) | Note |
|---|---|
The color of the file path is based on the usual PARTproject rules. This means that hidden projects are also displayed here in red font color. | |

![[Tip]](https://webapi.partcommunity.com/service/help/latest/pages/jp/installation/doc/images/tip.png) | Tip |
|---|---|
You can change the content of an editable field in the table by double-clicking on it. Changes are marked as bold text. | |

If you move the mouse pointer over the Group column, all assigned groups are displayed as a tooltip.
![The Groups column in the Administration variable [Variable Management]](https://webapi.partcommunity.com/service/help/latest/pages/jp/installation/doc/resources/img/img_3983aae762cc449f90af55a20f5f4fa5.png)
If you click on a cell within the Group column, you can call up the Variable groups window via the button.
| Note |
|---|---|
Variable groups [Groups of variables] can be created and managed on the General tabbed page under Create variable groups. See Section 5.9.2.3.2, “ Creating variable groups (at catalog level) ”. | |
![Window Variables Groups [Variable groups]](https://webapi.partcommunity.com/service/help/latest/pages/jp/installation/doc/resources/img/img_37b8cdd0ca224b6aac55177d129e71c7.png)
Use the filter [Filter] line to filter the table. Select a term or enter something.
| Note |
|---|---|
Select <empty> to filter for empty fields. You can search using wildcards ( * ), e.g. " C* ", " *C " or " *C* " | |
The system checks the variables in the table and displays a yellow or red warning symbol if a corresponding entry contains an error. You can move the mouse over the symbol to display the warning text as a tooltip.
![Example warning: "The variable is in a group, but hidden. [The variable is in a group, but hidden.]"](https://webapi.partcommunity.com/service/help/latest/pages/jp/installation/doc/resources/img/img_93038da00dd741a8a49fa377a6054c6f.png)
Example warning: "The variable is in a group, but hidden. [The variable is in a group, but hidden.]"
As soon as there are problems, you can use the navigation at the bottom left to jump to the corresponding messages.

When you have corrected all errors, click on and / or .
With SVN-managed catalogs, variables can only be managed if the catalog is checked out. If this is not the case, you can open the variable management [Variable Management] but not make any changes. If you open a part from this view in PARTdesigner, it also only opens in read-only mode.
![Variable management [Variable Management] in read-only mode](https://webapi.partcommunity.com/service/help/latest/pages/jp/installation/doc/resources/img/img_f0278ed43bd7438c87c6af07cd1e44c1.png)
If you select a directory that contains both checked-out and checked-in parts, a dialog box appears.

You can then view all projects in read-only mode or ignore the read-only parts so that they are not displayed in Variable Management.

Above the table, you can export the displayed table by clicking the " button.
The Export tables [Table export] dialog box opens, see chapter Section 7.12.17, “ Save as CSV file ”.
: See below.
If the option is activated, linked projects are also loaded. These linked projects can be located anywhere in the catalog, i.e. also outside the initial selection. This can result in projects being displayed in the file paths that do not belong to the actual selection.
The visibility of linked projects depends on the visibility of the link.
Select which projects should be displayed based on their visibility.
Above the table
there is the option  variables
loading [Reload variables]. If you have previously made changes,
a dialog box that asks whether you want to save the changes or
.
variables
loading [Reload variables]. If you have previously made changes,
a dialog box that asks whether you want to save the changes or
.
You can use additional functions by right-clicking on any cell content (except the header).
You can combine two or more variables by holding down CTRL and clicking to select the rows you want to combine. Right-clicking on one of the selected rows opens the context menu, where you can select " Combine Variables [Combine variables]."
In the window of the same name, you can make a selection before merging if there are different entries in the same column. After pressing , the rows are aligned and the old values are overwritten.
You can use Reset variables to reset previously made changes to a line to the original value.
Deletes the selected variable after a confirmation prompt, provided there are no dependencies.
Opens the Table Export [Table export] dialog box for the selected rows.
![[Important]](https://webapi.partcommunity.com/service/help/latest/pages/jp/installation/doc/images/important.png)
![[Caution]](https://webapi.partcommunity.com/service/help/latest/pages/jp/installation/doc/images/caution.png)
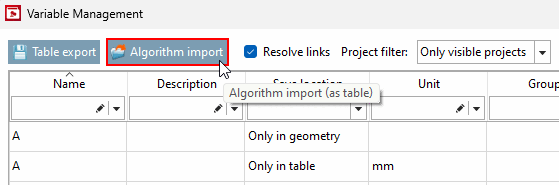
In PARTproject, on the Variable Management [Variable Management] dialog page, you can assign algorithms to an entire catalog using a batch file.
To import an algorithm for a specific project, use PARTdesigner.

For batch import, follow these steps:
Right-click on the desired catalog > Automation > Manage Variables [Manage variables] to open the Variables Management [Variable Management] dialog box.
Click the "Algorithm Import [Algorithm import]" button there. (This button has nothing to do with the "Export" button next to it.)
-> The " Import Algorithm (as Table) [Algorithm import (as table)] " dialog box opens.
Click on " Meta CSV " there, then click , and open the corresponding batch file in the Explorer window
-> Each CSV file is loaded, and the algorithms are checked for validity. Any errors are displayed in the dialog box.
-> All target projects must be checked out.
Structure of the batch file (batch_import.csv):
The header must be included and must look like this:
"PRJ_PATH","ALGO_CSV_PATH"
So, each line is associated with a project and the corresponding algorithm .
The project file paths can be absolute or relative to the target catalog. The algorithm CSV file paths can be absolute or relative to the meta CSV.
"PRJ_PATH","ALGO_CSV_PATH"
"algo_table_import.prj","algo_table_a1.csv"
"algo_table_import.prj","subdir/algo_table_a2.csv"
"algo_table_import_2.prj","algo_table_a2.csv"
"subdir/algo_table_import_3.prj","algo_table_a3.csv"
Structure of the algorithm CSV files:
The structure is identical to that of PARTdesigner (see above ).
If necessary, have a report generated during an import that lists all changes. To do this, assign an output file under "Report CSV [Report CSV]."
As soon as you click , you can see in the history whether the import was successful. You will also receive a status message indicating whether any changes were made or not. If nothing was changed, the generated CSV file will be empty.
-> A dialog box opens, displaying information about the progress .
-> The algorithms are imported and saved in the target projects .

![Import algorithm [Algorithm import] Report CSV](https://webapi.partcommunity.com/service/help/latest/pages/jp/installation/doc/resources/img/img_b1beb2b6a7bb42f68ef4d9b706666a94.png)
