7.13.5.6.1.  "Condition properties " dialog box

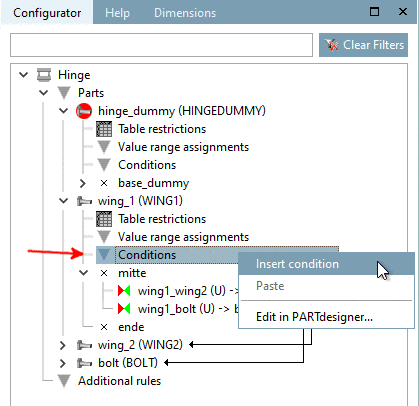
Conditions can be assigned to each component. A secondary mouse click on Conditions calls up the context menu command New condition and Insert condition.

Call "New condition [New condition]"

Call "New condition [New condition]"

You can use Paste condition [Insert condition] to move a previously copied condition to the desired position.

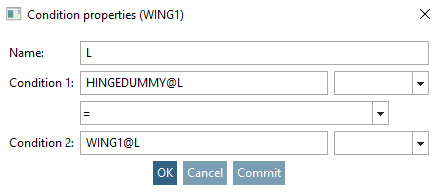
The New condition context menu command opens the Condition properties window.

Condition properties window

Condition properties window

There, the variables (length, diameter, etc.) of the dummy start part (this contains the controlling table in the assembly) and the individual parts can be set to the ratios = , < , <= , > , >= , <> using operands.

[Note]Note

When defining the conditions, refer to the dummy start part if possible.

With the help of the Variable Browser [Variable browser] (see below) you can easily use the correct syntax.

Example

Condition 1 = Condition 2 --------------------------------- SCHARNIERDUMMY@L = FLUEGEL1@LThe

entire expression in the Condition Properties [Condition properties] dialog box reads as follows:

The variable's "L" value of the dummy starter part "HINGEDUMMY" shall correspond to the variable's "L" value of the part "WING1".

[Note]Note

If calculations are carried out for an actual-equal (=) comparison between conditions, please only use data type integer or text if at all possible. In general - not PARTsolutions specific - errors can occur in calculations when comparing floating point numbers.

In particular, if numbers are part of order numbers or part numbers, do not use data type [Data type] Decimal number.

[Note]Note

You can also use ERP variables in conditions!

E.G.: BN1536@ACTIVE_STATE <> 0 (Locked)

[Note]Note

Condition 2 is automatically filled in by default with the corresponding part and variable.

If necessary, this behavior can be switched off via Tools [Extras]Settings...AssemblyAutomatically fill in conditions.