For the automatic assignment a process has to be created.
Click on the Add new process command in the context menu of Workspace -> Processes -> Item assignment [Article Assignment].
Click on the Load predefined template
 and then on the template dimension search [Dimension search].
Select the single nodes one by one. Thereby the respective setting options are displayed. The respective selection is marked in yellow. In red nodes you have to perform settings mandatorily. In green nodes further settings can be made optionally. A complete green pipeline may be executed.
Select product source [Product Source].
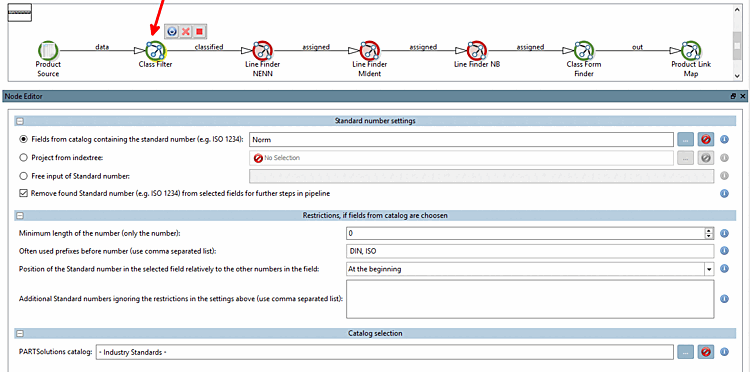
Select the Class filter [Class Filter] node.
Standard number Settings [Standard number settings]:
Fields from the catalog that contain the standard number (e.g. ISO 1234) [Fields from catalog containing the standard number (e.g. ISO 1234)]:
Select the attribute (or several) that contains the standard number and move it to the right using the arrow key. Confirm with .
-> Selected attributes are displayed in the input field now.
PARTsolutions Catalog: Select the desired catalog in the same way as above using the Browse button .. .
-> The Class filter [Class Filter] node is now displayed in green.
Select the Line Finder NENN node and click on the Browse button to specify the attribute (field) for dimensioning [Dimension] and material [Material].
Click on the Start button to execute the pipeline.
-> A corresponding message appears in the Performance docking window.
Optionally, save the process. In this way you can call it anytime and use it again (possibly modified). Click on the respective icon
 .
.

![[Note]](https://webapi.partcommunity.com/service/help/latest/pages/jp/3dfindit/doc/images/note.png)
![Load template for "Dimension search [Dimension search] "](https://webapi.partcommunity.com/service/help/latest/pages/jp/3dfindit/doc/resources/img/img_2fa40fa3a76d43f79e0364394064b26b.png)