![[Note]](https://webapi.partcommunity.com/service/help/latest/pages/jp/3dfindit/doc/images/note.png) | Note |
|---|---|
Do not carry out a connected installation via a network drive, but only directly on the computer in question! Parallel operation of V12 eCATALOG 3Dfindit and V12 ENTERPRISE 3Dfindit is possible. | |
The standard modules PARTproject (catalog creation) and PARTadmin (administration) are installed.
By default
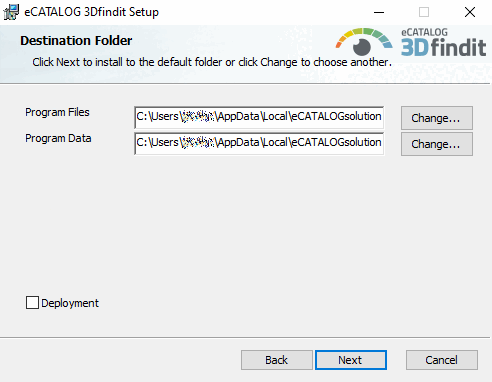
the installation is carried out under C:\Users\username\AppData\Local\eCatalogSolutions.
Accept the terms of the license agreement and click .
Specify the folders in which the software is to be installed.
The button allows you to select a folder on the hard disk other than the default one (if necessary).
![[Important]](https://webapi.partcommunity.com/service/help/latest/pages/jp/3dfindit/doc/images/important.png)
Important If you change the default paths, observe the following rules:
Program Files and Program Data must be independent of each other!
The 1st rule must not be circumvented in the second dialog of destination folder [Destination Folder] .
CADENAS_DATA, CADENAS_POOL, CADENAS_SITESETUP, CADENAS_USER must not be in or under the folder "Program Files" (software installation)!
Reason: The software directory is completely provided by MSI and additional files must be removed beforehand in the automatic update process to avoid conflicts with old or obsolete files.
Example of correct directory structure:
Program Files=c:\cad\software
CADENAS=c:\cad\software
CAENAS_DATA=c:\cad\data  <-- ok ..
CADENAS_POOL=c:\cad\pool <-- ok ..
Example of incorrect directory structure:
Program Files=c:\cad\
CADENAS=c:\cad
CAENAS_DATA=c:\cad\data  <-- error
CADENAS_POOL=c:\cad\pool <-- error
If the directory structure is incorrect, a corresponding error message appears.
POOL must never be below DATA!
The Deployment item is deactivated by default and is generally not required when installing eCATALOG 3Dfindit.
Caution! When using Deployment, you are completely free to set the directory structures. However, this overrides all checks by the software!
Deployment can/should also be used for client distributions. An image created by an admin/consultant can then be distributed to the clients via copy or share. Only the files are copied without system entries. Any number of copies can be created. (Make sure to select a different target directory each time).
Click when you have made your selection.
→ The second settings page of Destination Folder opens.
In the standard case, the default paths of CADENAS DATA, CADENAS SITESETUP, CADENAS Pool and CADENAS User do not have to be adjusted.
Example of the
start.env: The path under CADENAS_DATA has been modified.[ENVIRONS] CADENAS=%DirOfThisFile% CADENAS_SETUP=C:\Users\username\AppData\Local\eCATALOGsolutions\ProgramData\setup CADENAS_DEFAULTUSER=$CADENAS_SETUP\user\default_user CADENAS_SITESETUP=C:\Users\username\AppData\Local\eCATALOGsolutions\ProgramData\sitesetup CADENAS_USER=%UserAppData%\eCATALOGsolutions\user CADENAS_LICENSE=$CADENAS_SITESETUP\lic CADENAS_POOL=C:\Users\username\AppData\Local\eCATALOGsolutions\ProgramData\pool CADENAS_DATA=D:\data_minimal\The applications are installed PARTproject, PARTdataManager and PARTadmin are installed. Open the applications via the start menu.
Integrations: Install the integrations that you have purchased.
Below you will find a list of the selection options:
Mechanical engineering integrations:
Autocad integrationCATIA IntegrationCreo Parametric, Inventor Integration, SOLIDWORKS Integration, Solid Edge Integration, NX Integration, Creo Elements/Direct Integration Fusion 360 Integration, Bricscad Integration
Revit IntegrationArchicad Integration, Allplan IntegrationVectorworks IntegrationMicrostation Integration, Tekla Integration
Mentor Capital IntegrationZuken Integration, EPLAN Integration, AutoCAD Electrical Integration, Cosmos Integration
Neutral, Addons, Mechanical CAD-systems, BIM CAD-systems, Electrical CAD-systems
→ The installation is started.
Completed the eCATALOGsolutions Setup Wizard
As soon as the installation is complete, this message appears. Click to exit the setup wizard.
By default, the selected interfaces are activated during installation. You can check this in PARTadmin under the CAD integration category and activate or deactivate interfaces if necessary. See Section 1.4.2, “ CAD integration ” in ENTERPRISE 3Dfindit (Professional) - Administration.
Under
C:\Users\username\AppData\Local\eCATALOGsolutions\ProgramFiles\install\scriptsbatch scripts that can be executed locally at any time to enable/disable all interfaces.Open PARTadmin > License management [License administration] and import an already received license on the Licenses tabbed page via :
Otherwise, you can apply for a license on the Apply for licenses online [Request licenses online] tab.
Details on licensing can be found under Section 1.5, “ License administration ” in ENTERPRISE 3Dfindit (Professional) - Administration.