1.3.8. Semi-automatic sizing with the help of training sets
1.3.8.5. Classification procedure |  |
| Prev | Next |
To enable a user to classify products semi-automatically, initial training sets [Training-Sets] must be stored for classes. To do this, a product that is to be used for the training set is dragged and dropped onto the structure or added to the training set [Add product to Training-Set] using the context menu command Add product to training set [Add product to Training-Set].
Semi-automatic classification works both on the PARTwarehouse catalogs in the workspace [Workspace] as well as directly on the PARTsolutions -Catalogs under data sources [Data sources]. The following description refers to classifying under data sources [Data sources].

The individual steps are explained below:
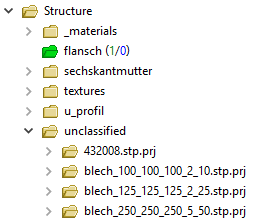
Directory with unclassified parts and directory structure, which should contain the parts to be classified.
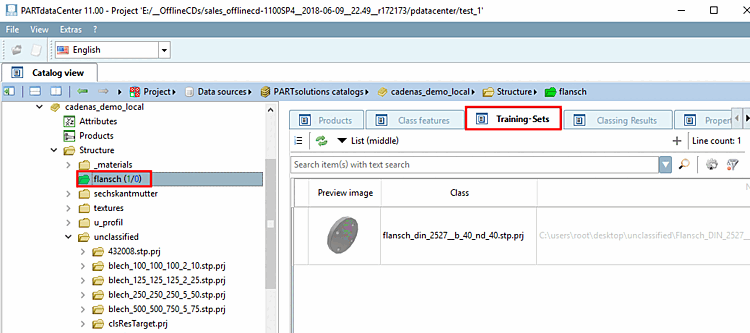
Create training sets [Training-Sets]
Create training sets [Training-Sets]. To do this, select a suitable part and drag and drop it into the desired directory under Structure.
The green directory indicates that the directory contains training sets [Training-Sets].
The green number indicates the number of training sets [Training-Sets] included.
The blue number shows existing class proposals. In this example, there are none yet.
On the Training sets [Training-Sets] tab page, the stored part is now visible as a training set with all attributes.
Determine at least one training set for each directory.
Classify products [Class products]
You can classify individual, several or all products at once.
As soon as you click on Classify products [Class products], the classification process begins.
Switch to the Classification results [Classing Results] tab page.
As soon as the classification process is complete, class proposals can be viewed in the Classification results [Classing Results] tab.
The following figure shows the result after the classification has been carried out for a specific U-profile.
1/0+1
Meaning: 1 training set (green), 0 existing class proposals (blue), 1 class proposal added with the last run (light blue).
You can then check the class suggestions, remove them, confirm them or carry out a new classification run.
Compare with training set [Compare with Training Set] -> Load classification hits [Classing Match] and training set into the component comparison [Part comparison]
In addition to the 3D view, you can conveniently compare attributes and topological parameters
Recalculate classification result [Recalculate Classing Result] -> Run again, additional training sets or classes may have been created / changed
Remove products from the classification result [Remove products from Classing Results] -> The results do not match
Add selected products to the class [Add selected products to class] -> Confirm the class proposal for the product
As soon as a product is added to the catalog using the Add selected products to class command, the product is also created at structure level and the product/class link is created.
View the result on the Products [Parts] tab page.


![[Note]](https://webapi.partcommunity.com/service/help/latest/pages/jp/3dfindit/doc/images/note.png)


